Intro
Imagine a scenario where you have been assigned a new feature for your developing app. Do you start by imagining all possible paths the user can take with said feature? What about errors, tests, or edge cases? Sometimes, it can be hard to visualize all the logic inside the app (especially when it’s very big) and all the possible states it can take.
XState offers us a solution for this. It is a state management library for JavaScript and TypeScript that uses event-driven programming and finite state machines to handle complex logic predictably and visually.
In this blog post, I will teach you how to use this library with React and unlock a new way of developing apps. You’ll quickly find out the benefits of using this approach and the basics to get started. Let's start!
Prerequisites
To continue with this blog post, I highly encourage you to visit this repo.
This is a simple Trivia app (using Rick and Morty characters) where the user answers a set of questions. The trivia ends when you lose all your lifes or if you get a score higher than 100. The app was built using XState v5 and will help us understand the key concepts of state machines. We will build the logic step by step until we get the final state machine that you can see on the repository.
You can also see the state machine on the following link.
Key Concepts
Let’s review some key concepts to understand how this library works.
- State Machine: it can be defined as a model used to describe behavior in terms of a set of states, transitions between those states, and actions associated with the transitions.
Look at the following example where we model a basic part of our trivia: answering a question
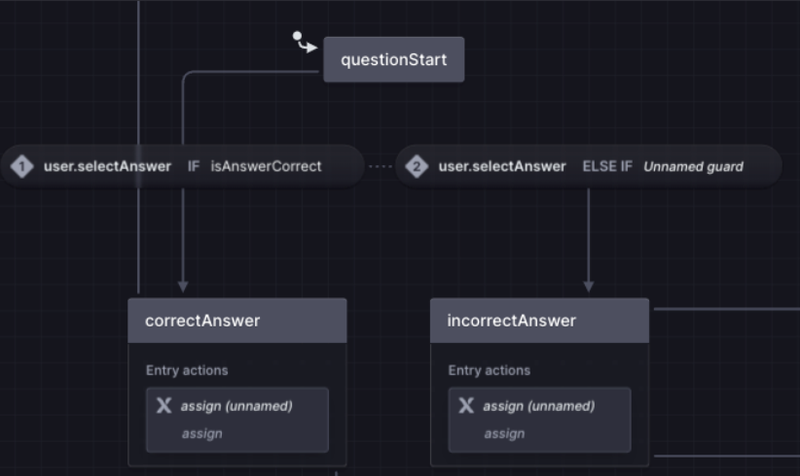
We already have a state machine here! But what do the arrows and blocks represent? Let’s continue reviewing more concepts.
- State: A state describes the machine’s status. A state machine can only be in one state at a time. In our example, our states (which are represented by blocks) would be questionStart, correctAnswer, and incorrectAnswer.
- Transitions and events: A transition represents how the machine goes from one state to another. Events cause transitions; when an event happens, the machine transitions to the next state. In our example, we have the event “user.selectAnswer” which takes us from the state questionReady to correctAnswer or incorrectAnswer (depending on the answer given by the user, we will see more about this when we take a look at guards)
The trivia app we will build
To start using XState and talk about its core features, let’s first review the app we are going to build and the logic that it will handle.
We will connect to the free Rick and Morty API, to get info from various characters and randomly pick one for the user to guess its name.
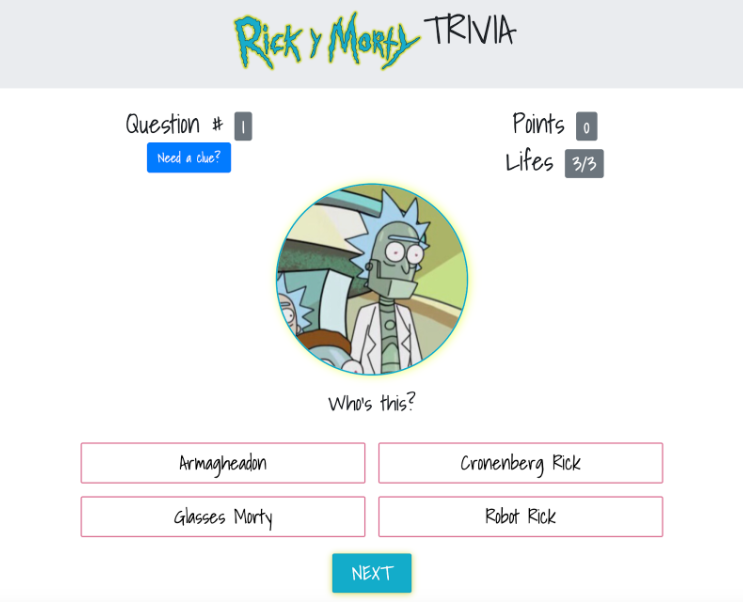
The rules will be pretty simple:
- The user has to guess the identity of 10 characters to win.
- For each right character, the user gets 10 points.
- For each wrong answer, the user loses a life
- If the user has no lives left, he/she loses.
- The user gets the chance to see a clue for every question
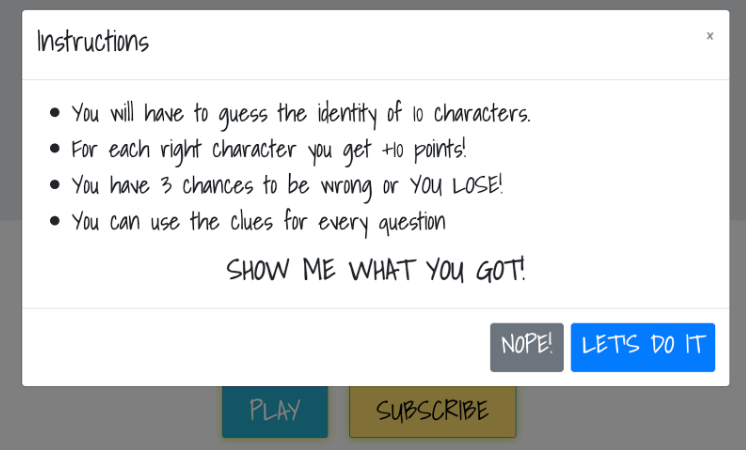
We will have a homepage to start the game, and a modal to show the instructions to the user like this:
Coding the initial state machine
Now that we understand how our app will work, let's continue by coding the state machine!
On an empty React project, install the following packages:
- xstate
- @xstate/react
Note: This tutorial was built using XState v5, so make sure to add that version (or higher) to your project. Any other lower version isn’t compatible with the syntaxis and methods described here.
Now we will add a new folder called machines in the src directory and inside that a new file called triviaMachine.ts.
To create a new machine, we need to import createMachine from XState and add the following code:
import { createMachine } from "xstate";


const triviaMachine = createMachine({
   id: "triviaMachine",
   initial: "homepage",
   context: {
   },
   states: {
       homepage: {}
   }
 });
What’s happening here?
First, we are defining a new machine using the XState function createMachine. This function receives an object which defines the logic of the machine.
In this example, we have:
- id: A string to identify the current machine
- initial: The name of the initial state of our machine. In our case, we have defined an initial state called “homepage” which we will define inside the property states
- context: This is an optional object where all the data needed for the machine to work will be stored. You can access and modify the data here with the help of other functions.
- states: One or more state objects that represent the current state of a machine. In this case, we have defined our initial state homepage.
We have successfully defined our initial state machine, but how about we visualize what we currently have coded? After all, that’s one of the greatest benefits of using this approach.
To see our machine we have two options:
- The first one is to copy the code and use it with the official XState studio web tool here: https://stately.ai/registry/editor. You will be asked to register and create a new empty project. Once you have done that, you can go to the left-side menu and see a list of all your created machines. Select the one you are currently editing and open the menu. You will see the option Export Code. Click on it and a new window will appear where you can paste the code. You will now be able to see your machine.
- The second option (which is my preference) is to install the XState extension on Visual Studio Code. This extension will detect the machine inside our code and give us the option to open a new window to visualize it.
Whichever option you choose, you will be able not only to see your machine but also to simulate it and manually add more states and transitions without coding.
Let’s see how our machine looks right now:
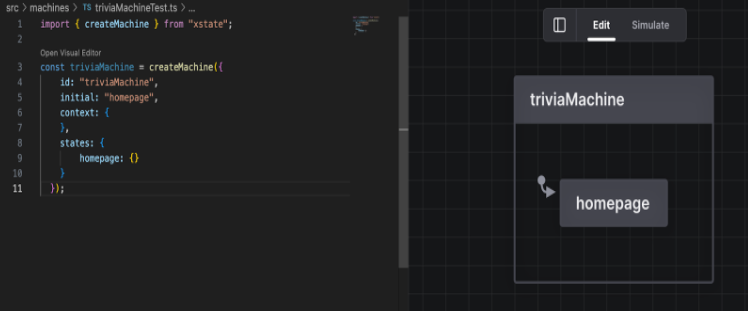
All good! Let's continue by defining the variables we will need inside our context.
Context and the assign() function
As we have already mentioned, the context is an object that defines the variables of our machine. This property is available in all states and is immutable. This means that it cannot be modified directly.
Let’s add some data to our context. Based on the rules of the game, we can identify the variables we will need as follows:
- lives: the number of lives
- points: the number of points the user has in the game
- question: the number of the question
- currentCharacter: the character that the user has to guess
- randomCharacters: the list of characters that will be part of the options to guess
This is how it would look in the code: (remember to initialize the data to a default value)
context: {
       currentCharacter: null,
       randomCharacters: null,
       points: 0,
       question: 1,
       lives: 3,
   },
Note: We will look at how to safely type the context and other parts of the machine later.
If we need to modify the data in the context, we will need to use the assign() function. This function is directly imported from the XState library:
import { assign } from "xstate";
To use it, you will need to pass an object into the function with the properties that you need to modify. For every property, you can access the context of the machine, or an event (if the required value comes from an external source).
In the following example we can see that:
- We assign the result of some event to “randomCharacters”
- We increase the value of “question” by one by accessing the current value in the context
- We directly assign the value of 10 to “points”
assign({
  randomCharacters: (({event}) => event.output),
  question: (({context}) => context.question + 1),
  points: 10
})
Let’s continue by adding states and transitions to our machine, and see how the assign function can be used inside the logic of our machine.
Adding States and Transitions
The starting point of our app will be a home screen where the user can click a button to start the game. Once the button is clicked, a modal will appear to show the user the instructions of the game. The user then has three possible paths:
- Accept the rules and start playing
- Reject the rules and close the modal
- Close the modal without accepting or rejecting
How does this translate to our state machine? To model this behavior, let’s think of what happens when we are on our initial state “homepage”.
As a user, we click on a button to start the game (event) and that takes us to a modal with game instructions (new state). This can be defined as the following:
states: {
  homepage: {
    on: {
      "user.play": {
         target: "instructionModal",
       },
    },
  },
}
Here we are modeling exactly what was described to us. Inside the “homepage” state, we add the “on” property. This property expects an object that has the name of the event that will transition into the next state by using the target property. Basically, what we are saying is that if we are on the homepage state and receive the “user.play” event, we will transition into the target state “instructionModal”. Pretty straightforward, right? Let’s also add the new state “instructionModal” and model the logic there:
states: {
       homepage: {
         on: {
           "user.play": {
             target: "instructionModal",
           },
         },
       },
       instructionModal: {
         on: {
           "user.close": {
             target: "homepage",
           },
           "user.reject": {
             target: "homepage",
           },
           "user.accept": {
             target: "startTrivia",
           },
         },
       },
       startTrivia: {},
     }
Can you guess what’s happening here?
If the user is in the “instructionModal” state, it can transition back to the “homepage” if he rejects the instructions or closes the modal. However, if he accepts the instructions, it will transition to a new state called “startTrivia”. Just like we initially described! We now have successfully modeled the required logic into our state machine and learned about states and transitions.
Actions
When we transition through states we will also need to execute some kind of function or logic in the state machine like updating the context, logging a message or sending an event. Generally, this is what we know as “actions”.
Actions can be defined in many parts of the state machine (states, setup, events) depending on your needs.
Take the following generic example:
on: {
      someEvent: {
          actions: [
                    ({ context, event }) => {
                     console.log(context, event);
                   }
                 ]
           }
         }
}
Here we are saying that when we trigger the event “someEvent”, we will also be triggering the actions associated with it (in this case a simple console log). When defining an action we are able to access the context of the state machine and also the event we are firing through object destructuring.
There are many ways to define actions in XState so I highly recommend you visit the official documentation for more examples here. In our app, we will mostly be using actions inside events to assign new values to our context like this:
actions: assign({
           randomCharacters: (({event}) => event.output),
           question: (({context}) => context.question + 1),
           hasLoaded: true
     }),
Actors
It’s time to talk about actors, which is a concept as important as state machines.
In a few words, an actor is a unit of computation that has its own internal state and can receive and send events (the same concept we have for stores in other libraries like redux or zustand).
How is it connected to the state machine?
On its own, when we define a state machine, it isn’t able to actually send events or receive them. We need to instantiate a state machine or make it “run”. This instantiation is what we know as an actor.
Just like a blueprint is just the diagram that defines the plan to follow in building a house, the state machine is the logic that defines and helps us create an actor. This is the reason why we can have multiple actors from the same state machine.
There are multiple ways to define the logic of an actor. In this blog post, we will focus on two of them: state machine logic and promise logic.
Promise Actors
Let’s try to visualize the homepage of our trivia app. We have a big title in the center, a button to start the trivia, and a set of images on the bottom with different characters like this:

These images will be fetched randomly using the free Rick & Morty API. We will make a request once the user enters the homepage. Let’s see how to apply this part to our state machine and how promise actors work.
To define a promise actor we use the fromPromise method. This method expects a promise and creates an actor which is able to:
- Send events
- Receive an input
- Produce an output (the resolved value of the promise)
- Handle errors
For example, to create an actor that fetches the random characters for our homepage we can define it as follows:
fromPromise(() => RickCharacters.getCharacters(Math.floor(Math.random() * 34))),
Note: The RickCharacters object is the service we have defined in our project that sends a request to the API.
Integration with our state machine:
To add this actor to our state machine, we are going to modify it a little bit.
const triviaMachine = setup({
}).createMachine({
// machine logic
})
Before calling the createMachine function, we are going to call the setup function. This function is where we can define strong typing for events, context, etc; and also add the actions, actors and guards that will be used throughout the machine.
Let’s add the promise actor we defined before like this:
const triviaMachine = setup({
 actors: {
     loadHomePageCharacters: fromPromise(() =>      RickCharacters.getCharacters(Math.floor(Math.random() * 34))),
 }
}).createMachine({
   // machine logic
});
We define the property “actors” and inside we add an object where each key is the name of the actor. In this example we can see the actor “loadHomePageCharacters” which will be in charge of getting random characters from the API
Once we have our promise actors defined, we can use them inside the state machine logic:
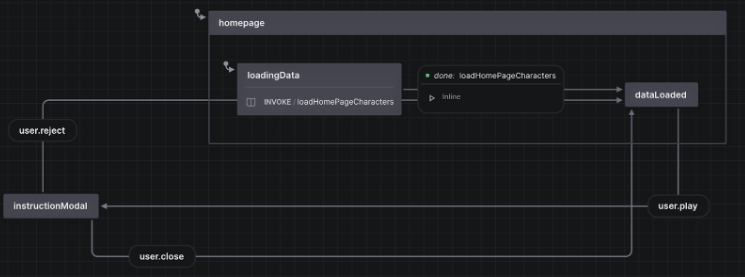
homepage: {
           initial: "loadingData",
           states: {
               loadingData: {
                   invoke: {
                       src: 'loadHomePageCharacters',
                       onDone: {
                           actions: assign({
                               homePageCharacters: (({event}) => event.output),
                               hasLoaded: true
                           }),
                           target: "dataLoaded"
                       },
                   },
               },
               dataLoaded: {
                   on: {
                       "user.play": {
                           target: "#instructionModal"
                       }
                   }
               }
           },
       },
Handling promises with the invoke property
You may have noticed a few new things in the last bit of code. First of all, we are now defining child states inside the homepage state.
Each state can become a parent state by adding an initial state and then its corresponding states like we had on our initial state machine. The benefits of having this approach is to group logic that belongs to the same state and also separating it in smaller, more manageable chunks of logic.
You may be able to guess what’s happening now on the homepage, but let me explain it in a little more detail.
First, we have the initial state called “loadingData” and a new property called “invoke”. This property will help us handle promises inside the state machine. Invoke works with the following properties:
- src: expects a string with the name of the promise actor that will be executed
- onDone: defines what logic the state machine should follow when the promise successfully finishes
- onError: defines what logic the state machine should follow when there is an error on the promise
Invoke triggers the API call as soon as the state machine gets to the state where it is defined. In our example, we call the API to get info from random characters. If it is successful then we get the data of the response (using “event.output”) and assign it to our context homePageCharacters variable. We also go to the next state of our machine (using the “target” property) which I have called “dataLoaded”.
Once we are in this state, we can continue to open the instruction modal and play the game.
We can immediately start thinking of what can happen if the promise fails. This is one of the benefits of using state machines. It makes us think through the states that the app can have so that we can model the behavior we expect.
You could use the onError property to define an error handling state that can take the user back to the initial state, show a button to retry the request, or automatically resend the request by the machine.
Here’s how the state machine is looking now:
Guards
We will encounter times when creating our state machine when we need to transition from one state to another only if certain conditions are met. This is what we know as guards and they help us transition securely through states.
For example, let’s look at this state from our trivia app:
questionStart: {
                    on: {
                            "user.selectAnswer": [
                                   {
                                       target: "correctAnswer",
                                       guard: "isAnswerCorrect"
                                   },
                                   {
                                       target: "incorrectAnswer",
                                       guard: not("isAnswerCorrect")
                                   },
                               ]
                         }
                 },
When the user selects an answer we will transition to the “correctAnswer” state if the guard “isAnswerCorrect” resolves to true. Otherwise we will transition to the “incorrectAnswer” state. Notice how we can also use “not”, an XState operator that takes in a guard to resolve the opposite boolean value that it returns.
The guard is defined in the setup function as follows:
guards: {
       isAnswerCorrect: ({context, event}) => {
           if(event.type !== "user.selectAnswer") return false
           if(!context.currentCharacter) return false
           return event.answer === context.currentCharacter.id
       },
   },
We are basically saying that if the answer selected by the user equals the current character id in the question then the answer is correct. We also add an event type check so that this guard only works when we are triggering the user.selectAnswer event and an extra check to make sure the current character in the context exists.
Using the state machine in React
Once we have our state machine ready, it’s time to use it inside our React app and check how easy it is to apply the logic and behavior we already defined.
Creating an Actor Context
First, we will need a global state since we are going to access it through various components. For this, we are going to apply the same logic as Contexts.
If you are not familiar with the concept of Context, you can check it in the official React documentation here. To sum up a little bit, Context is a way of making the parent component have data available to any component in the tree below it without passing props.
We will create a Context using our state machine as follows:
import { createActorContext } from "@xstate/react";
import triviaMachine from "../triviaMachine";

export const TriviaMachineContext = createActorContext(triviaMachine)
Then, we will wrap our App component with it using the Provider:
const App = () => {
 const navigate = useNavigate()
 return (
     <TriviaMachineContext.Provider
       logic={triviaMachine.provide({
         actions: {
           goToTriviaPage: () => navigate("/trivia")
         }
       })}>
       <Routes>
         <Route path="/" element={<Home />}/>
         <Route path="/trivia" element={<Trivia />}/>
       </Routes>
      </TriviaMachineContext.Provider>
 );
};
This way we now have access to all the variables defined in the state machine context in every part of the app. You may have also noticed that the Provider has a prop called “logic”. This is entirely optional but can come in handy to add additional functionality to our state machine that is more specific to the React ecosystem.
In this example, we are using the hook useNavigate to navigate through the different routes in the app. Since hooks can only be called inside a React component, we are not able to use them inside the state machine. However, by using the “logic” prop, we can call our state machine and the “provide” method. This method can override the values we defined in the machine to new ones. In this case, we can add the “navigate” hook functionality to the “goToTriviaPage” action.
Accessing the global state with useSelector
Remember we had our initial state on the homepage where we automatically triggered a call to the Rick & Morty API to get random characters. This data was then assigned to the “homepageCharacters” variable in the context. To access this data in any of our components we need to use the useSelector hook as follows:
 const state = TriviaMachineContext.useSelector((state) => state)
 const { homePageCharacters, hasLoaded } = state.context
We import our state machine context and call the useSelector hook which will give us access to the state. Inside the state we can call the context and finally any of the variables defined in the state machine.
We now can use our homepageCharacters and pass them to our components. For example:
{homePageCharacters.length > 0 && <ImgsBack characters={homePageCharacters} />}
The component ImgsBack will take the data and render the images in the homepage.
The state is not only useful to access the context, but it also gives us methods that can be helpful to decide which components can be rendered. For instance, we can also access the matches method. Look at the next piece of code:
<Col xs={12}>
       {state.matches({startTrivia: {
         questionReady: "lostGame"
       }}) ?
       <Lose />
     : state.matches({startTrivia: {
         questionReady: "wonGame"
       }}) ?
       <Win />
      : <div>
      <CharacterPicture />
      <GuessOptions />
    </div>}
 </Col>
When using “state.matches” we need to pass down an object describing which state of the machine we want to compare. In this case we are checking if the current state is equal to the “lostGame” state to render the “Lose” component. We do the same for the “wonGame” state. If neither of them are true we simply render the game options so the user can keep playing. It's simple and easy to read for anyone who is looking at this code for the first time.
Sending events with useActorRef
There are events and transitions inside the state machine that are triggered automatically, but most of the time we will need the user to trigger transitions through different actions inside the app. For example, clicking on a button, filling an input, sending a form, etc. For this, we will need to call the useActorRef hook with our state machine context as follows:
const triviaActorRef = TriviaMachineContext.useActorRef()
With this hook we can trigger any transition by sending events to the machine using the “send” method like this:
<Button onClick={() =>
                 triviaActorRef.send({type: "user.play"})
                 } primary>
                 PLAY
               </Button>
What’s great about this is that when the user clicks on the button, we send the “user.play” event. The machine will take care of executing the logic inside the new state we are transitioning to. Also, this has a secure way of handling unexpected results. If the machine isn’t in a state where the event can transition into another state, the button won’t do anything.
I highly recommend you to go through the code and see how we are using this approach in other parts of the app. Our components just take data from the context and send events. All the logic is moved to the state machine!
Conclusions and future recommendations
To sum up, XState is an incredible state management library that helps us build our app logic by using state machines and being able to visualize them. Although it can be hard to understand and learn all the new concepts at first, it gives us many advantages that can make our apps more secure, maintainable and easier to read.
This post has a lot of information and the basics to get you started using this library. We built a trivia game app that shows how state machines work and how they can be successfully integrated with React.
Be sure to check the final state machine of our project and the code repository to gain more insight on the other parts of the app that weren’t described here. Also, try implementing state machines in your projects and check the official documentation because there are still more advanced features that will leave you wanting to learn more. Until next time!


